I'll be dog gone ~


dog gone it.....photography by Marty Mason


Where does my time go? 
 I haven't been sitting idle;
No one has me tied down
However,
I feel that I've been left behind.
And
 
 I have no explanation about nor proof of my busy-ness! 
Who would ever have thought I could use this picture of a little beagle puppy tied in the streets of Levanto, Italy, in a blog post!


What's not to love about a THREAD tree?


The thunder woke me early, so I've already opened my emails and ordered my tall thread tree.  You see, Alyssa over at Pile O' Fabric says she always uses a free-standing very tall thread tree - even if her sewing machine doesn't come with one built in.   Since purchasing my Juki, I've become very accustomed to the built-in thread tree and can really see the difference.  So, now, I wanted a tall one for my Bernina and couldn't find one tall enough.  What's a girl to do?  I emailed Alyssa with my plight and she immediately sent me the link to Connecting Threads.  My tall thread tree is now in the mail.  It doesn't have a lot of branches....one tall branch standing 11" high  was all I needed. 


Clinging Vine: ColorBoard No. 23


Clinging Vine:  Photography by Marty Mason


As pretty as some of them are, clinging vines are no fun to have around.  Most of them are nuisance vines, invasive in one's space, and are difficult to get rid of.
 
Don't be 'A Clinging Vine'
Unless it's in a ColorBoard

Bookmaking Ingredients ~

"The books went to press."  I now know more about what that statement means.....you see, yesterday was my first day at the bookmaking workshop at Monroe's Masur Museum.  A workshop taught by Frank Hamrick.   By the end of today, I'll come home with two new books - the pages will be empty, but they'll still be hot off of or from under the press! 


Frank Hamrick's bookmaking workshop at Masur Museum


Frank Hamrick's bookmaking workshop at Masur Museum


Ingredients for bookmaking
 
Ingredients to bookmaking
First you measure and cut, then you paste, press and sew.....
All in a two-day bookmaking workshop!
 

How to make a matchbook-style note booklet

The littlest things make me happy: 

book-style note booklet


All one needs is a photograph....any photograph to make a matchbook-style booklet.   It's just the right size for my purse or pocket, ready to grab and jot a quick note or phone number as a memory jogger later.   Here's how:

I printed my photograph on 4" x 6" photo card stock, but any weight card stock would be fine.   Fold in thirds.....the bottom will fold up 1" and the top will fold down 2 1/4"  The top should overlap the bottom fold by 1/2".  

Now to make the sheets for your booklet.  The 'back' of your booklet should measure 2 3/4" x 4" so you want your paper inserts to be smaller.  I cut mine at 2 1/4" x 3 1/2".  Copy paper will do just fine for this and 12 is a good number to start with.  After you've cut, then stack all 12 inside the booklet and stitch across the top of your papers, about 1/4" down from the top. 

Now to finish the matchbook, fold the bottom 1" up and stitch across the bottom edge 1/4" from the bottom.  This gives the front of your booklet a tab - the matchbook style - to hold the top flap in place.

Need more explanation - here's a picture or two.  Hope you can see.  The first one was a picture taken of a page in a book. 


And here is a picture of a neighbor's cat who came to visit.  He posed so prettily, knowing one day he would be a cover for a matchbook-style booklet for my purse.   Here you can see the stitching line to secure the note paper and the bottom stitching line that makes the tab for tucking the front in place. 


front cover of my matchbook-style booklet

And another shot of the top and bottom stitching lines.  I like to bring the thread to the inside and tie a knot to secure and then clip the excess. 


A WIP worked itself off the design wall ~

Oh, Boy!  I finished the Crosses quilt top and decided on the backing.  Only one decision left (well, actually two).  #1 How to quilt it? And, #2 what to use for the binding? 

Comma by Brigitte Heitland for Zen Chic for Moda

Crosses will finish at approximately 50" x 70"....a perfect napping quilt size.

Comma by Brigitte Heitland for Zen Chic for Moda


Artificial Tree ~


Good morning Sunday:  Can you see me now?

Photoshop Sketchbook:  Property of Marty Mason


In explanation....we have a great neighborhood, friendly, clean, with an active neighborhood watch, walkers, joggers, traffic a little too fast.  We like being aware of what's going on - just in case.  Well, the other day, a new and yet to be identified item appeared in our neighbor across the street's front upstairs window.  I noticed it and commented to the HuMAn.  He had noticed it also, but figured that night as the lights came on he would be able to identify the item.  Well, that didn't happen. 

I'm still curious;  he is too.  We aren't stalkers, just curious.  Now, I didn't know he was doing this, so I'm no witness.....but he came in with a big smile on his face and identified the object.....an artificial tree, he proclaimed.  I finally mustered enough courage to ask how he knew and he explained that he got his big camera out - the one with the zoom, really zoom, lens. 

That's when I stopped him....I didn't need to know the rest of the story.  As I said, I'm no witness and continue to hold fast to the fact that we aren't stalkers, just curious folks.  


Lady Of The Lady....a quilt block pattern

A pretty quilt block.  Sisters Ten BOM choice....Lady of the Lake.....in two colorways.  To minimize wasting the other half of the half-square triangle,  I surrounded one of my blocks with the Brandon Mably fabric in the blue flutter colorway and the other in the red flutter colorway. 


This one is my favorite.....no, wait!

Lady of the Lake quilt block pattern


I like the red one too....can't I have two favorites this month? 

Lady of the Lake quilt block pattern


I have a pretty little secret ~

that I just can't contain any longer. 

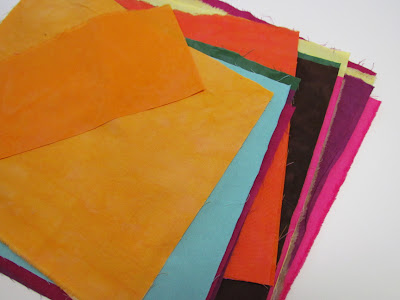
When at QuiltCon back in February, I found this most wonderful fabric....hand dyed by Cherrywood Fabrics.   In addition to the full yardage (which I couldn't resist), I found what Cherry calls 'grab bags' which contain  at least 50 cuts of her hand dyes.  Okay, now the secrets out - what a diverse sampling all contained in one little package.  It's the grab bag hand dyes that I used this morning to make my wonky crosses. 

grab bag by Cherrywood Fabrics


Cherrywood and ZenChic fabrics


I found the ZenChic, Comma, layer cake at Quilt N' Stitch the other day and didn't want to waste not one fraction of an inch of these 10" squares.  Between the two fabrics, I think I'm gonna love this one.  Here's the start "Going Steady." 


wonky cross quilt WIP


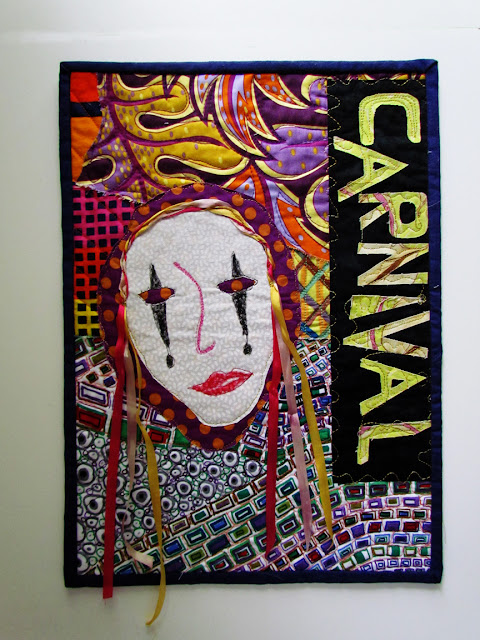
Art Quilt Challenge Theme ~ Carnaval

I usually don't begin an art quilt based on any particular theme.....I just start!  But in our group, Art Quilts Around The World, we make an art quilt each month based on a theme.  It's a newly formed group and the first one we published was entitled 'self-portrait.'  Now for reveal #2.....
'Carnival.'  All 30 of us in the group posted our finished art quilt March 31.  Another specific about each of our art quilts is size....each one is 11 1/2" x 16" - wait...is it 11" x 16 1/2!!  Oh, my.   There is so much energy and talent in this group, I'm racing to stay up.....smiling as I run with them.

Carnaval:  an art quilt by Marty Mason

There's always a story,  visit Art Quilts Around the World for the rest of it. 


Improv Curves:

What a gem of a gal....Lisa Calle demonstrated how she makes improve curves at QuiltCon.  I tried it yesterday and oh, how quickly this little 40" x 40" (or so) quilt came together.  Starting with 10" squares of different fabrics  that I felt comfortable practicing on - those that I wouldn't cry about if I didn't get the improv curve process just right.  But I got it right the first time and kept on and on until - each block was trimmed to 8 1/2".  Some I sliced only once, some twice.  Something to keep in mind is that the blocks shrink with each slice.  While working with larger blocks to begin with might be manageable, I found 10" ones very comfortable.  If I had sliced a third time, I probably would have finished with a block about 8".  I might try that next.  I have some Zen Chic, Comma, fabric that I've been itching to cut into.  Can't wait to make more improv curves.....Lisa Calle style. 


improv curves


So easy that I even had time to piece my backing.  I found this yard of fabric in my stash, but it was just a tad too narrow.   Three fabric insertions did the trick.  Now this improv quilt is ready for me to practice my free motion quilting on.  Now that's a work-in-progress! 


What? A Fool?


Don't be fooled by my April, 2013, Quilter's Calendar. 

April, 2013, Quilter's Calendar


All the days are there....just remember that this April week starts Monday but the rest of the weeks begin on Sunday.    Sure, it's free to download as your desktop background.  I'm on Flickr

P.S.:  I'm loving the Sew Mama Sew/Pile O' Fabric big block BOM.