no beast is a burden

"I am who I am"........by me.  I am Marty Mason.
All Alone Am I
no beast is a burden when looked at from every possible angle
there's good in most things
 it just takes
keeping an open mind and being flexible
while thinking about the beast
or the burden
 
and on another topic -  i had a thought this morning.....comfortable bra......is an oxymoron!
 
and, while i love to draw, i'm not trained so must draw in my own style.  oh, i know  she isn't beautiful, but she was what was in my head this morning.   sketched, painted, saved and shared in photoshop. 

and in further explanation - oxymoron is derived from the greek term "oxymoros".  that means "pointedly foolish."   Oxymoron = the conscious combination of two contradictory ideas that together creates a new, overall concept.  For example, bittersweet, pretty ugly and living death and comfortable bra! 


More about my Quilt As You Go (QAYG) Kid's Quilt

You know the song "I Get Around"  by the Beach Boys....

" I'm gettin' bugged driving up and down the same old strip.
I gotta find a new place where the kids are hip." 

Well, I've been getting around....learning all about how to attach each separately quilted block in the easiest, neatest fashion to get to my finished quilt.   

Step 1 - make your block, sandwich your layers (top, batting, back) quilt, trim away excess.  Make another block and another and another. 


Step 2 - combine block 1 to block 2.   Combine blocks 3 and 4. Combine blocks 5 and 6.  Now combine first row to second row and then to third row.

Quilt As You Go kids quilt

 I spiced this kid's quilt up a bit by adding the red, aqua and purple attaching strips.   Anything goes with a kid's quilt. 


close up of QAYG attaching strips (finished 1/2" wide)


You get the picture.  And so your quilt grows.  And when it is done, it is done.  So do-able since the block size makes the quilting very manageable under your domestic sewing machine. 

back of quilt as you go kids quilt.  I still need to complete the hand stitching and add the border....marty mason


Next step....On the back finish the closure by hand (or machine).  I prefer the hand sewn finish and use the ladder stitch.  Complete and neat.   

And, finally, add the quilt binding.  Thou shall be done ASAP. 


The beginning of a quilt-as-you-go kids quilt.

I've only been awake for a little while, but already my day has taken an upward curve.  It's not a great picture, but I'll explain:  

 Yesterday my fellow Tuesday Bee Group and I met up to sew.  I only had one project in my bag.....a gentle curve idea for a kid's quilt.  I started with seven 18" squares, all stacked right side up on top of each other and cut a gentle curve through all layers.  Sharp rotary blade required.  I then mixed and matched and sewed them back together in this order.   Well, not exactly in THIS.   

There's always a story.  Because I knew I would not get the blocks arranged the same way twice, I took a picture of the way I wanted the quilt top to be sewn back together.  Just a friendly reminder to self of how the task should be completed.  Hmmmmm.  Yep, you guessed it.  Even with the photo to prompt me, I still sewed my blocks together in not the right order!    I thought I would learn to like the arrangement, but alas, it just wasn't working for me so when I got home, I ripped a couple of seams, re-arranged and now like THIS arrangement better. 

I was just about to sew all these big blocks back together this morning when the idea hit me

QAYG quilt top sample work in progress


I've been wanting to do a demonstration for the quilt guild on how to complete a quilt-as-you-go-quilt.  Now that this quilt top is ripped, I have the perfect opportunity to make a step-by-step of how I do the quilt-as-you-go (QAYG) technique. 


I'll post more about this as I progress in making my QAYG sampler.  In the meantime, remember that a smile is an indicator of which direction your day will go.   Upward curves...we all have them.

Next on my list of what kept me smiling:  I pulled some of my most recent mod fabric purchases and pinned them in random order on my design wall.  I like this already and think this improv design will make a great modern quilt using the QAYG method to easily get a quilt made....from start to finish:


QAYG....it's a good thing!


It's January, and here is the calendar~


It's not that I've been busy.  It's just that, well,  it's just that my time has gotten away from me.   Tick, tock, tick, tock.  Wait for me, January, 2014.  Here's just a little something to show that I've been doing something other than nothing....it's my January, 2014, calendar and it's up and ready for the desktop download....a background just to remind me that time waits for no man.


Time waits for no man - January, 2014, calendar by Marty Mason


Does the quilt idea come first.....or does the fabric?

What does come first?   Probably like most of you, it goes both ways.  Often times I gather fabric that plays together and then allow the fabric to pick the game.  That's the case in this quilt anyway. 

I was given a few vintage feed sacks last year and was about to pass them on (what was I thinking) when I came to my senses and started pulling some fabrics from my stash that went well with the vintage feel of the feed sacks.  Preview picture No. 1.

el using vintage feed sacks - scraps galore quilt by marty mason
 
Rearranged to get another fabric preview:  I'm good with this collection....now to cut and sew.

el using vintage feed sacks - scraps galore quilt by marty mason


I just randomly selected fabric combinations to complete a bunch of little triangle blocks.  There's no real rhyme nor reason to the combinations...except that they didn't fight with each other. 

el using vintage feed sacks - scraps galore quilt by marty mason


And then the real playground fun began - sewing all those triangle blocks together - to the finish line.  It's very vintage yet still has a fresh, modern feel.  Quilted by Hannah Marie Lee in Choudrant, Louisiana.  Smile.

el using vintage feed sacks - scraps galore quilt by marty mason


Stamping the morn away ~


It's been so cold these past several days, I've gotten a lot of reading done and needed something new to do this morning.  When I started looking around my studio, my eyes kept wandering back to the Speedball.....the new and improved lino cutter (so the box says)!  It wasn't a Christmas gift this year, but one from years past.  And I've never used it.  It's not that I didn't want the cutter for Christmas that year - I'm sure it was on my list....otherwise, how would he have known!   It's just that I sometimes get so comfortable with " the way I always do it" that I just didn't see the need, until this morning, to learn something new.  But it's a new year, so why not have this old dog learn a new trick.  Those are my words.  You had better not, I repeat, do not call me an old dog!!!

So, from start to finish:   Here's my first stamp using the Speedball lino cutter. 

First, I sketched a hedgehog (or semblance thereof) on paper to use as my reference.

handmade hedgehog stamp by Marty Mason


Then, I sketched the hedgehog on my moo carve and began shaving away excess moo so the object of the stamp will be raised higher than the stamp base. 

handmade hedgehog stamp by Marty Mason


I trimmed and added paint and stamped until I got what I thought might be my best effort.  Yes, I did get a little rambunctious in my trimming and sliced off his hind leg.  But, then, who's counting, especially since my original sketch only gave him three legs to begin with.  Perfect is not always ideal (so says the artist). 

handmade hedgehog stamp by Marty Mason


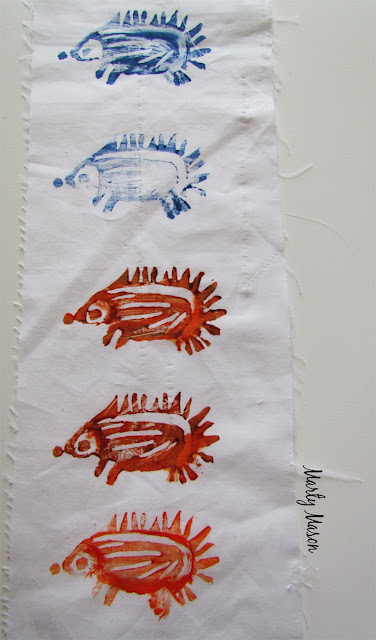
Added different paints to my newest stamp and I now have a hedgehog fabric column to use in some future project. 

handmade hedgehog stamp by Marty Mason
 
No, this is not a lizard, nor is it a porcupine...it's a hedgehog and he is so cute.  Perhaps I should have started off with a more simple design.  Perhaps an elephant next time.